Spotify For MAC v1.2.49.439 Download (MacOS/Apple)

Spotify for Mac is an Amazing App in the world of digital music. It gives Mac users a smooth and engaging listening experience. It’s designed for their desktop and laptop devices. Spotify is a leading platform in music streaming, offering access to countless songs, albums, playlists, and podcasts.

Name

Shopify for MAC

Updated

28 November 2024

Compatible 

MacBook Air/MacBook Pro/iMac

Version 

v1.2.49.439

Size

4 MB

MOD Features 

Premium Unlocked

Category 

Music & Audio

Developer

Spotify AB

Price

Free

Spotify makes it easy for users to explore, discover, and enjoy music, turning their Macs into personalized audio hubs. Its appeal lies in instant access to an extensive library of songs spanning different artists and genres, all in one convenient app. Whether it’s the latest chart-toppers, timeless classics, or unique indie tracks, Spotify offers something for everyone.

Mac users also benefit from created playlists, personalized recommendations, and algorithm-generated mixes, enabling them to discover music that fits their tastes.

This article digs into the features, functions, and benefits of Spotify for Mac, highlighting how it has revolutionized music streaming for Mac users. With its user-friendly interface and vast music library, Spotify for Mac has become a go-to platform for music enthusiasts, transforming the digital listening experience. Read also: Spotify Zodiac Affinity.

Table of Contents

Impressive characteristics of Spotify for Mac

Spotify for Mac offers an extensive music collection and many features to boost the listening experience. Users can create personalized playlists, follow their favorite artists, and smoothly share music with friends. Its connection with social media makes it easy to share songs and playlists with online communities, developing a sense of connection and friendship with all music enthusiasts.

Extensive Collection of Music

Spotify for Mac has a wide range of music. It includes millions of songs, albums, playlists, and podcasts. You may prefer popular songs, independent discoveries, or specialized music styles. Spotify offers many options to provide to all musical preferences.

Easy-to-use platform

It’s not difficult to use. Spotify’s Mac application has an easy-to-use interface. It lets users easily find, explore, and manage their music. The organized design and user-friendly interface guarantee a smooth and lovely listening session.

Suitable Suggestions

Spotify uses algorithms to make custom playlists and suggestions. They modify these to your listening habits, likes, and current moods. Find new artists, tracks, and genres that fit your tastes. They will ensure a continuous stream of music that connects with you.

Social Sharing and Collaboration

Spotify for Mac lets users share their favorite songs and playlists. They can also share their listening activities with friends, family, and followers. Spotify adds social media integration. It also adds collaborative playlist features. These create a feeling of connection and community for all music lovers.

Ensuring compatibility across different platforms

Spotify syncs your music collection and preferences on many devices. These include Mac, iPhone, iPad, Android devices, and web browsers. Start listening on your Mac at home. Switch to your iPhone while traveling. Then, resume on your iPad or web browser at work.

Offline Listening

Spotify Premium subscribers can download their favorite songs, collections, and playlists. They can then listen to them offline on their Mac. This feature is helpful. This is for people who want to listen to music while traveling without the Internet. This includes flights, road trips, and commutes in areas with limited network coverage.

Top-Notch Audio Streaming

Spotify provides great audio streaming choices. For example, you can stream music at 320 kbps with Spotify Premium. Hear a sharp sound. It’s precise and ensures that you enjoy your favorite tracks in top audio quality.

Consistent Updates and Enhancements

Spotify regularly updates its Mac app. These updates add new features, improvements, and bug fixes. They improve the user experience and respond to user feedback. This dedication to improvement guarantees that Spotify for Mac stays reliable. It also remains innovative for music streaming.

Get Spotify on your Mac

You can quickly get Spotify Mac on your PC to enjoy unlimited music, unlimited streamings, and a lot more, including podcasts, group sessions, and many more. Here is the complete guide to getting Spotify Mac on your PC.

  • Launch your favorite web browser on your Mac and go to the official Spotify website
  • When you’re on the Spotify homepage, find and click on the “Download” button. By doing this, the website will identify your operating system. It will offer the correct download link for macOS.
  • After the download is done, find the Spotify installer document in your Downloads organizer. It might similarly be in the area set by your internet browser’s settings. Click twice on the installer file to start the installation process.
  • Proceed with launching the Spotify installer wizard. Just follow the on-screen instructions from the installer wizard. They will help you set up Spotify on your Mac. You might be required to provide your administrator password to authorize the installation.
  • After installing Spotify, you can start it. You can find it in your Applications folder or use Spotlight. If you have a Spotify account, click “Log In”. Enter your username and password to access your account.
  • If you are a newbie to Spotify, simply click on the “Sign Up” button to set up a new account. Just follow the instructions. You will input your email, pick a password, and fill in other needed details to set up your account. People also search for Spotify++ IPA Download.
  • After logging in, you can start to explore Spotify’s large collection. It has music, podcasts, and playlists. Utilize the search bar to track down artists, collections, or tracks. On the other hand, explore playlists and ideas customized to your listening history and preferences. Art your playlists, track your favorite artist and explore new music to enjoy on your Mac.
  • You can change settings for playback quality, social sharing, and notifications. To access the Settings menu, click your profile icon. It’s in the top-right corner of the Spotify app. Then, choose “Settings” from the dropdown menu.
  • After setting up Spotify to your liking, take a moment to relax. Listen to your favorite music, podcasts, and playlists on your Mac. You can use Spotify at work, hit the books, or just chill out. It offers many entertainment options. You can easily access them on your device.

How do you use Group Session on Spotify for Mac

Do you want to use Spotify group sessions? It allows many people to work together. They will share a listening experience and add to the same playback queue. Here’s a guide on using Group Session on Spotify for Mac:

Initiate a Group Session

Open the Spotify app on your Mac and start playing music. Find your way to the playback controls at the application window’s bottom. Find and click on the icon that looks like a speaker, labeled “Devices Available,” positioned next to the volume control. Choose “Start a Group Session” from the dropdown menu to receive a unique code for your session on Spotify.

Here is the Spotify Code

Once the group session starts, share the special Spotify code with friends or family members. They are the ones you want to join the session. You can share the code through messaging apps, email, or any other method that fits you and your receivers.

Join the Group Session

Participants should engage in it by opening Spotify on their Mac or another compatible device. To access the playback controls in the Spotify app, find and tap on the icon labeled “Devices Available.” Choose the “Join a Group Session” option and input the special Spotify code given by the session host. Participants will be linked to the Group Session and connected with the host’s playback line after joining

Control Playback Together

When everyone is connected to the Group Session, they can all manage the playback queue. Every individual can contribute songs to the queue, skip tracks, modify the volume, and pause or play the music. Any changes by a participant, such as adding a song or skipping one, will be instantly visible to all members of the Group Session.

Experience Listening Together

Everyone in sync and the same playback queue can have a shared listening experience. Maybe you are organizing a virtual listening party. Or, you can work together on a playlist. Or just sharing music with friends. Group Session lets everyone join in on the music

Conclude the Group Session

The host can do this by selecting “End Session” in the Spotify app. The Group Session will end automatically after a period of inactivity. This usually happens after several hours without playback.

How to optimize sound quality on Spotify for Mac

To get the best sound on the Mac, adjust settings and preferences to improve your listening. To improve sound quality to get the most out of your audio, Here’s a guide on how to improve sound quality for Spotify on the Mac:

Make sure to review the audio quality settings

To access the Spotify app on your Mac, simply open it and head to the settings menu. Find the “Music Quality” or “Playback” section in the settings menu. Choose the best audio quality settings for streaming and downloading. Spotify provides many bitrate options, and higher bitrates lead to improved sound quality. Opting for a higher bitrate guarantees that you are streaming or downloading music with the top audio quality available. Read Also: Add Members to Spotify Family Account:

Make sure to use high-quality playback

Spotify Premium users can activate high-quality playback. This allows music to stream at 320 kbps. Make sure that you are enjoying the top audio quality offered on Spotify. For best playback, go to the settings menu. Look for the “Music Quality” or “Playback” section. Turn on the “High-Quality Streaming” feature.

Consider using an external DAC

You may want to use one to improve your Mac’s audio. A DAC bypasses your Mac’s built-in sound card. It delivers better audio to your headphones or speakers. Plug the external DAC into your Mac using a USB or another suitable port. Then, set your Mac’s audio to use the external DAC as the output

Maximize Speaker Placement

While using external speakers for music, position them for the best sound. Place the speakers at ear level. Keep them away from walls or corners. It reduces sound reflections and interference. Try different speaker placements to discover the best setup for your listening space.

Consider buying top-notch headphones or earphones

They sound accurate and give less audio distortion. Look for headphones with a wide frequency range. Also, find fewer obstacles. These features provide excellent performance. Listening with good headphones helps you understand the tones and details of your music

Fine-tune the Equalizer Setting

Spotify for Mac has an equalizer for altering sound frequencies as you would prefer. Change the equalizer settings to help bass, high pitch, and mid-range. Do this in light of your music taste and the class you are paying attention to. Track down the equalizer settings in the settings menu and pick the “Adjuster” choice.

Ensure your Mac has a fast and reliable internet connection

It will reduce buffering and interruptions while playing music. The fast, reliable internet lets Spotify stream music at the best bit rate. It does this without losing sound quality.

How to enhance bass using music on a Mac:

When using music on a Mac, set up an environment where music promotes attention. It should not be disturbed. Here’s a guide on how to concentrate while listening to music on your Mac:

Selecting the Appropriate Music

Choose music that increases focus and concentration, such as instrumental tracks, eco sounds, or lo-fi beats. Avoid selecting songs with lyrics or sudden tempo changes that could divert your attention from your tasks.

Select playlist

Create a playlist of music designed to increase attention and productivity. Share songs or tracks that help you focus and match the work you have to do.

Use Music Streaming Platforms

Try services like Spotify, Apple Music, or YouTube Music on your Mac. They offer many music kinds and playlists. These are fit to help with focus and productivity.

Activate Focus Mode

 Some music apps provide features such as “Focus Mode” or “Concentration Mode”. They remove distractions and play only music that helps you stay focused. Activate this functionality if it is accessible to improve your listening experience.

Modify Volume Settings

Adjust the music volume to a just right level, not too loud or soft. The music should create a background atmosphere. This should help you stay focused. It won’t be too much or distract from your work.

Use headphones or speakers for the best experience

Choose ones with great sound and comfort, even for long listening. Consider using noise-cancelling headphones. They will block outside noise. Then, you can entirely focus on your actions and music.

Try out various genres

Explore different music genres and styles to find what enhances your concentration and productivity. While some people prefer classical music, others may focus better with electronic or ambient tunes.

Take a break

Remember to take breaks! Don’t forget to take regular breaks. Take them from both work and music. This will help you avoid mental exhaustion and stay productive. Remember to take breaks. Give, rest your ears, and refresh your mind. Then, return to your tasks and music playlist.

Remember to be mindful

Remember to consider how music affects your concentration and performance. If you’re feeling less focused or productive with specific music, try changing your playlist or experimenting with different music styles while working.

Trial and Error

Try different music settings, playlists, and listening environments to discover what suits you best. Each individual may have different preferences and ideal conditions for maintaining focus while listening to music, so it’s important to stay flexible and adapt your strategy to improve productivity on your Mac. Get Full Guide Spotify Not Working.

How can I download songs for offline listening on Spotify for Mac

Download songs offline on Spotify for Mac. Then, you can pay attention to your number one music without an internet connection. Here is an aide on downloading tunes offline on Spotify on your Mac devices. Here you go:

Download

You want Spotify Premium to download tunes for offline tuning in on Spotify. If you have not yet, consider buying into Spotify Premium. You can do as such on the Spotify site or in the Spotify application on your Mac.

Open Spotify App

To open the Spotify app on your Mac, click on the Spotify icon in your Applications folder or use Spotlight search to find and open the app.

Looking for some tunes

Use the search bar in the Spotify app to find songs, albums, or playlists that you want to download for offline listening. Feel free to search for specific songs, artists, and albums or search for hand-selected playlists.

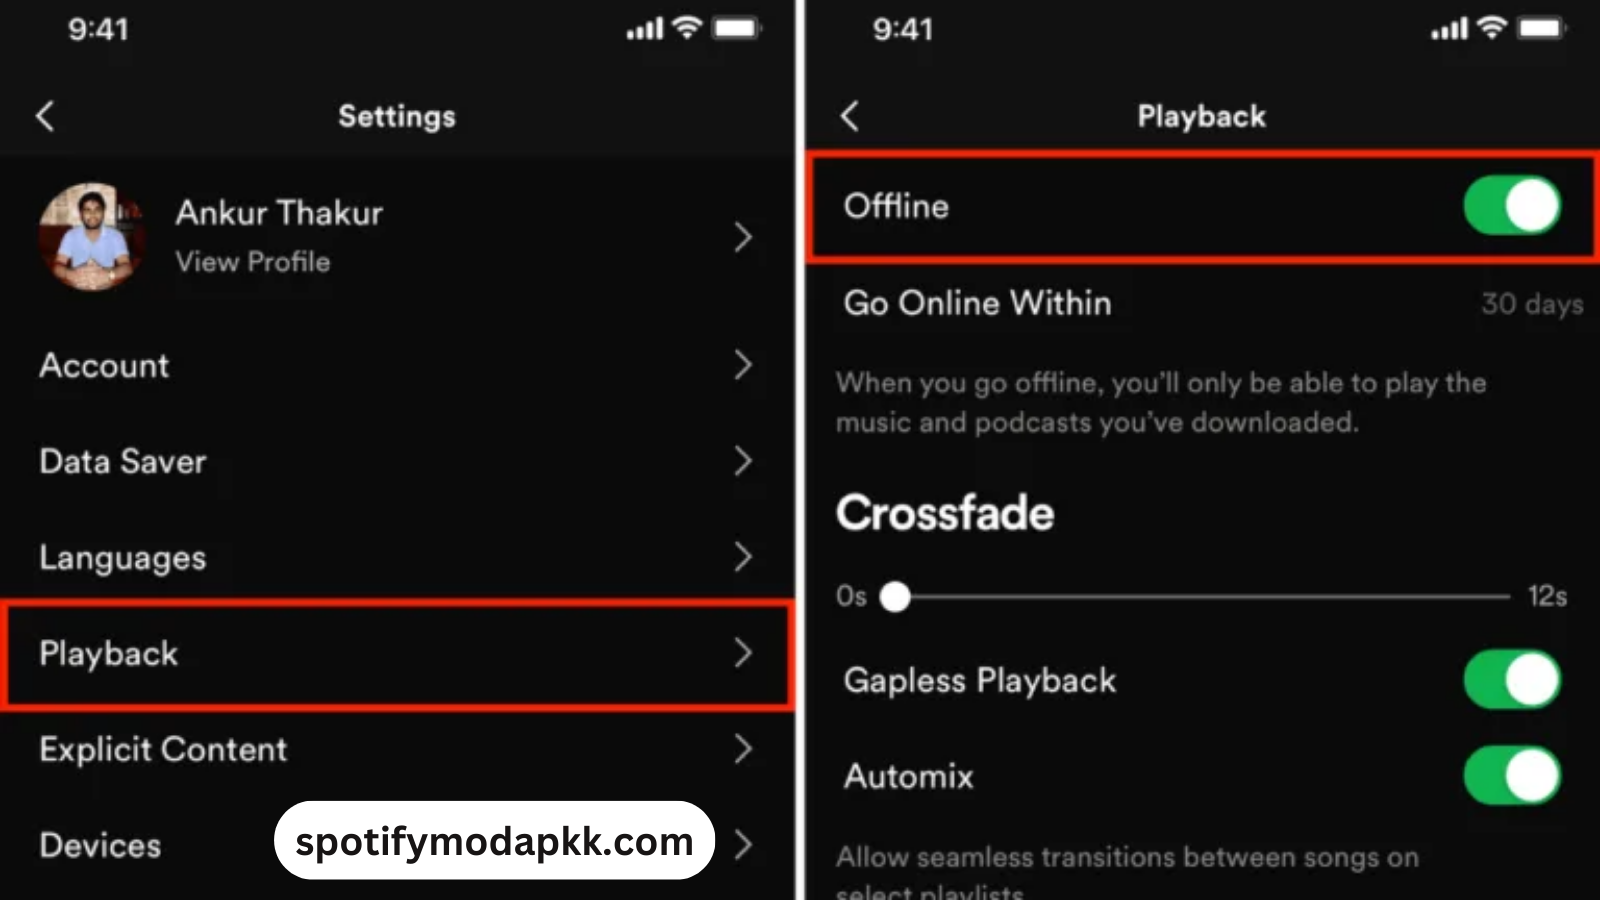
Activate Offline Mode

Make sure to enable offline mode in the Spotify app before downloading songs for offline listening. Go to the Spotify menu at the screen’s top-left corner and choose “Offline Mode” from the dropdown menu. Toggle offline mode to download music for offline playback.

Get Songs

After enabling offline mode, simply go to the song, album, or playlist you want to download for offline listening. Search for the “Download” button next to the song or album title. Just click on the “Download” button to start the download. To download playlists, simply click on the three-dot menu icon and choose “Download” from the dropdown menu to save the entire playlist. Spotify IPA will download the selected songs or playlists to your Mac for offline listening. A progress indicator will be displayed next to each song or playlist to show the download status.

Access Downloaded Music

Once you've successfully downloaded songs or playlists, you'll find them in the "Your Library" section of the Spotify app. To access your downloaded music, click on "Your Library" in the sidebar and then select "Downloads." From there, you can enjoy your music offline without an internet connection. Simply click on any song or playlist, and Spotify will play it directly from your local downloads. Check this also: Spotify Vanced APK:

Control Offline Downloads

You can manage your offline downloads at any time by going to the "Downloads" section in your library. To delete specific songs or playlists, simply click the three-dot menu icon next to the item and select "Remove Download."

How to create a crossfade effect on Spotify for Mac

Using crossfading on Spotify for Mac enables a smooth transition between songs. It will enhance the listening experience. Here’s a guide to activating crossfade on Spotify for Mac. Don’t worry, here you go:

Open Spotify App

To open the Spotify app on your Mac, simply click on the Spotify icon in your Applications folder or use Spotlight search by pressing Command + Space, typing “Spotify,” and pressing Enter to open the app.

Access Preferences

Once Spotify is open, click on “Spotify” in the menu bar at the top-left corner of your screen. From the dropdown menu, select “Preferences” to access the settings menu.

Go to Playback Settings

Navigate to the “Playback” tab in the Preferences window. You’ll find this tab at the top of the Preferences window, marked with a musical note icon for easy identification.

Activate Crossfade

Navigate to the “Playback” tab in the Preferences window. You’ll find this tab at the top of the Preferences window, marked with a musical note icon for easy identification.

Modify the Crossfade Duration

Once you’ve enabled the crossfade feature, you can modify its duration to suit your preferences. Simply adjust the crossfade slider, setting the duration anywhere between 0 and 12 seconds to achieve your desired effect.

Update Saved

Once you’ve adjusted the crossfade duration, click on the “X” button in the top-left corner of the Preferences window to close the window and make sure your changes are saved.

Experience smooth transition

Once you’ve adjusted the crossfade duration, click on the “X” button in the top-left corner of the Preferences window to close the window and make sure your changes are saved.

How can I view the lyrics on Spotify for Mac

As of the latest update, Spotify does not offer a feature to show lyrics within the app on Mac. However, there are ways to still access lyrics:

Apps for integrating lyrics from third-party sources

Many third-party apps and browser extensions are available to boost your Spotify experience by displaying synchronized lyrics as you enjoy your favorite music. Applications such as Musixmatch, Genius, and Sound Hound provide plugins or separate applications that show lyrics while you listen to music on Spotify. You can download these applications on your Mac and set up their integration with Spotify to view lyrics as the music plays.

Websites for Song Lyrics

You have the option to search for song lyrics manually on different lyrics websites like Genius.com, AZLyrics.com, or Lyrics.com. If you’re looking to check out the lyrics for a specific song, just open your web browser on your Mac, visit one of these websites, and search for the lyrics of the song currently playing on Spotify.

Mobile App

If you’re using the Spotify mobile app on your smartphone or tablet, you can access lyrics for many songs directly within the app. To do this, tap the “Now Playing” bar at the bottom of the screen to expand it. If lyrics are available for the track, you’ll see a “Lyrics” option. Tap on it to view synchronized lyrics that scroll along with the music.

Make sure to using Spotify Connect

If you’re using the Spotify mobile app on your smartphone or tablet, you can access lyrics for many songs directly within the app. To do this, tap the “Now Playing” bar at the bottom of the screen to expand it. If lyrics are available for the track, you’ll see a “Lyrics” option. Tap on it to view synchronized lyrics that scroll along with the music.

How to set the timer on Spotify for Mac

As per my most recent information, Spotify does not include a timer function within the application on Mac or any other platform. However, external tools or apps can set a timer while enjoying music on Spotify.

Use the timer on your Mac

Mac computers are equipped with a Clock app that offers a timer feature. Feel free to use this timer to establish a set duration while enjoying music on Spotify. To access the Clock app on your Mac, go to the Timer tab, select the duration you want, and click Start. You can enjoy Spotify while the timer runs in the background.

Consider using third-party timer applications

Many third-party timer applications can be found on the App Store for Mac users. These applications provide several features and customization choices for setting timers. Get a timer app from the App Store, choose the duration, and enjoy music on Spotify while the timer is running.

Use a Timer on Your Smartphone or Tablet

If you have the Spotify app installed on your smartphone or tablet, you can use the built-in timer feature on your device. Many smartphones and tablets come equipped with a clock or timer app for setting timers. Adjust the timer on your device for the preferred duration and enjoy listening to music on Spotify while the timer is active.

Use a smart speaker or voice assistant

When enjoying Spotify on a smart speaker or using a voice assistant such as Siri, Google Assistant, or Amazon Alexa, voice commands can set a timer. To set a timer for 30 minutes, just use your smart speaker or voice assistant. That way, you can enjoy listening to music on Spotify while the timer is running.

How can I boost the bass on Spotify for Mac

To boost the bass on Spotify for Mac, use the equalizer feature found within the Spotify app.

Launch the Spotify app

To open Spotify on your Mac, click on its icon in the Applications folder or use Spotlight search to find and open the app.
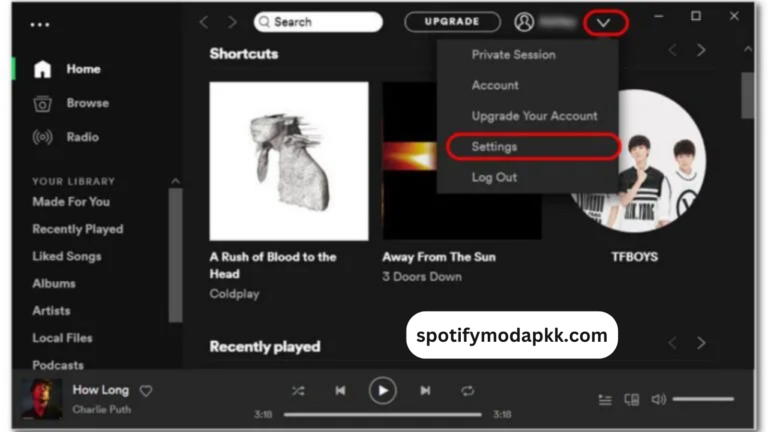
Access Preferences

After opening Spotify, click "Spotify" in the top-left corner of your screen and select "Preferences" from the dropdown menu to access the settings.

Proceed to Equalizer Settings

Navigate to the “Playback” tab in the Preferences window. This tab is at the top of the Preferences window, represented by a musical note icon. Within the Playback settings tab, find the “Equalizer” section.

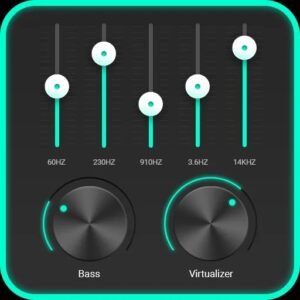
Adjust Bass Settings

Click on the “Equalizer” dropdown menu to display available presets or manual adjustment options. If you prefer to use preset options, select a pre-set that highlights bass, such as “Bass Boost” or “Hip Hop.” If you want to manually adjust the bass settings, select the “Equalizer” option from the dropdown menu to access the manual adjustment sliders. Look for the bass frequency range sliders, usually labeled as “Bass,” “Low,” or “60Hz.” Adjust these sliders to increase the bass level to your preference. Moving the sliders to the right increases the bass while moving them to the left decreases it.

Save Changes

After adjusting the bass settings to your taste, click on the “X” button in the top-left corner of the Preferences window to close the window and save your changes.

Test and Fine-Tune

Play a song on Spotify to test the adjusted bass settings and make sure that they meet your preferences. If necessary, go back to the Equalizer settings and fine-tune the bass adjustments until you achieve the desired bass level for your listening experience.

How to equalize the volume on Spotify for Mac

Equalizing the volume on Spotify for Mac ensuring consistent audio levels across songs and playlists on Spotify for Mac can enhance your listening experience. While Spotify itself lacks a built-in volume equalization feature, you can use your Mac’s Sound Enhancer settings to achieve this. Here’s how:

Open System Preferences

Click on the Apple logo in the top-left corner of your Mac’s screen and select “System Preferences” from the dropdown menu.

Access Sound Setting

In the System Preferences window, find and click on the “Sound” icon, represented by a speaker symbol.

Navigate to Sound Effects

Go to the “Sound Effects” tab at the top of the window within the Sound settings.

Enable Sound Enhancer

Check the box next to “Sound Enhancer” to enable this feature. The Sound Enhancer helps to boost the audio quality of your Mac’s speakers by adjusting the sound frequency levels and enhancing clarity.

Adjust the Sound Enhancer Settings

Click on the “Options” button next to the Sound Enhancer checkbox to access advanced settings. Use the slider labeled “Sound Enhancer” to adjust the intensity of the effect. Experiment with various levels to discover the balance that best suits your preferences.

Test Spotify Playback

Once you’ve adjusted the Sound Enhancer settings to your preference, open the Spotify app on your Mac and start playing music. Listen to several songs from different albums and playlists to ensure that the volume levels remain consistent and that the Sound Enhancer is effectively equalizing the volume across various tracks.

Fine-Tune as Needed

If you find that certain songs still have clear volume differences despite using the Sound Enhancer, you can manually adjust the volume levels within Spotify by using the volume slider in the app.

How to connect Bluetooth speakers to Spotify for Mac

Connecting Bluetooth speakers to Spotify on a Mac is simple. Make sure your Bluetooth speakers are powered on and in pairing mode. On your Mac, go to the Apple menu, select “System Preferences,” then click on “Bluetooth.” Locate your speaker in the list of available devices and click “Connect.” Once connected, open Spotify and the audio will automatically play through your Bluetooth speakers.

Turn on Bluetooth on Your Mac

To connect your Bluetooth speaker, click the Apple logo in the top-left corner of your Mac’s screen and select “System Preferences” from the dropdown menu. In the System Preferences window, choose “Bluetooth.” Ensure Bluetooth is enabled by checking the status at the top. Once your speaker appears in the list, click “Connect” to pair it. For more details, check out: Spotify++ IPA for iOS.

Put Your Bluetooth Speaker in Pairing Mode

Check your Bluetooth speaker’s user manual to find out how to enable pairing mode. This usually requires holding down a specific button until the pairing indicator begins flashing.

Pair Your Bluetooth Speaker with Your Mac

    • Put your speaker in pairing mode (refer to its manual if needed).
    • Open the Apple menu and select System Preferences > Bluetooth.
    • Turn Bluetooth on and select your speaker from the list of available devices.
    • Follow on-screen prompts to complete the pairing process.

Set Your Bluetooth Speaker as the Output Device

    • Click the volume icon in the menu bar at the top-right corner of your screen.
    • Choose your Bluetooth speaker under Output Device or Bluetooth.

Stream Music Through Spotify

    • Launch Spotify on your Mac and play your desired songs or playlists.
    • The audio will stream through your Bluetooth speaker.

Adjust Volume and Playback

    • Use your Mac’s volume keys or the Spotify app to control the playback volume and settings.

How to minimize Spotify for Mac

To minimize the Spotify for MAC, consider the following factors.

Using Window Controls

    • When Spotify is open, locate the three colored circles in the top-left corner of the window.
    • Click the yellow circle to minimize Spotify. It will reduce to an icon on the right side of your Dock.

Using Keyboard Shortcuts

    • Press Command (⌘) + M to instantly minimize Spotify to the Dock.

Using Mission Control

    • If you use multiple desktops, activate Mission Control by swiping up on the trackpad with three or four fingers or pressing the Mission Control key (F3 or F4).
    • Drag Spotify to a different space to declutter your current workspace.

 Click and hold the Spotify window, then drag it to the top of the screen.Drop it onto the desktop thumbnail in the Mission Control interface. This moves Spotify to a different desktop, effectively minimizing it from your current view.

Using the App Switcher

    • Press Command (⌘) + Tab to open the App Switcher.
    • While holding the Command key, press Tab repeatedly until Spotify is highlighted.
    • Release the keys, and Spotify will minimize.

How to reduce the size of Spotify for Mac

How to Reduce the Size of the Spotify Window on Mac

Manual Resizing

    • Move your cursor to an edge or corner of the Spotify window.
    • Click and hold the mouse button, then drag the edge or corner toward the center of the screen.
    • Release the mouse when the window reaches your desired size.

Using Window Controls

    • Locate the three circles in the top-left corner of the Spotify window.
    • Click the green circle to resize the window to fit the content. (Note: This action may not reduce the size but adjusts it to fit the content optimally.)

Keyboard Shortcuts

    • Hold down the Option (⌥) key and click the green circle.
    • This will resize the window to fit the content, similar to clicking the green circle alone but with a potentially different adjustment.

Using Mission Control

    • Swipe up with three or four fingers on your trackpad or press the Mission Control key (F3 or F4).
    • Drag and drop the Spotify window onto a desktop thumbnail at the top. This action moves and resizes the window as needed for the new space.

How to update Spotify for Mac

How to Update Spotify on Mac

Open the App Store

    • Click the Apple logo in the top-left corner of your screen.
    • Select App Store from the dropdown menu to launch the App Store.

Go to the Updates Tab

    • Once inside the App Store, click on the Updates tab at the top.
    • This tab is indicated by a downward arrow icon.

Check for Spotify Updates

    • The App Store will automatically search for updates for all installed applications.
    • If an update is available for Spotify, it will appear in the list of updates.

Update Spotify

    • Find Spotify in the updates list.
    • Click the Update button next to Spotify to start downloading and installing the latest version.

Authenticate if Required

    • Enter your Apple ID password or use Touch ID/Face ID if prompted for authentication.

Wait for the Update to Complete

    • The App Store will handle the download and installation.
    • Monitor the progress in the Updates tab.

Launch the Updated Version

    • After the update finishes, open Spotify from your Applications folder or by using Spotlight search.

How to uninstall Spotify for Mac

To uninstall Spotify from your Mac, you can follow these steps:

Close Spotify

Before uninstalling Spotify, ensure the application is closed if it’s currently running. Click on the Spotify icon in the menu bar and select “Quit Spotify.”

Open Applications Folder

Click on the Finder icon in your Dock to open a Finder window. In the Finder window sidebar, select “Applications” to access the folder containing your installed applications.

Locate Spotify

Scroll through the Applications folder to locate Spotify. Alternatively, use the search bar in the top-right corner of the Finder window and type “Spotify” to find the application quickly.

Move Spotify to Trash

Once you locate the Spotify application, drag it to the Trash icon in your Dock. Alternatively, right-click on the Spotify app and select “Move to Trash.”

Empty Trash

After moving Spotify to the Trash, right-click the Trash icon in your Dock and select “Empty Trash.” Alternatively, open the Trash folder, choose “Empty” from the Finder menu, and confirm the action.

To remove extra files

After uninstalling the app, open Finder and navigate to the following directory: ~/Library/Application Support/Spotify/. This path leads to the Spotify client cache directory. Delete any files or folders related to Spotify from these directories. Exercise caution when removing files from the Library folder, as some files may be used by other applications.

Conclusion

Spotify is an amazing platform that is popular with youth. It has amazing features that will let you download it to many devices. There is a plethora of music to download and view on the phone. The most gifted feature to explore in this tool is podcasts. The online playlist is another useful feature to explore. The users can make multiple channels and playlists online. Share your tracks with various groups and communities for fun.

The private and sleep modes are some of the hidden features we discussed in this post. So read all this information and enjoy using Spotify on any device.

Summary

Author Rating
Software Name

Spotify for Mac

Operating System

MacBook Air/MacBook Pro/iMac

Software Category

Music & Audio

Price

Free

Landing Page
Scroll to Top